

Notes Automatic Scheduling!
How to install and operate the Substack Scheduled Notes Extension for Chrome Version 1.2.3


One evening at dinner, Linda Naylor was discussing how her queue for Substack Notes needed some help. She wished there was some way Notes could be posted, scheduled and posted automatically, just like long-form posts.
Coincidentally, I saw a Notes post about that same issue. I told her about the Substack Scheduled Notes Extension for Chrome on Gumroad.com. Linda thought that might be just what she was looking for and delegated me, the household techie, to research it.
The Chrome Extension is developed by Substacker Finn Tropy, a software developer who built it as a side project. He uses it to post Notes for his Substack publication, Finn's Insights.
I use three browsers for my Substack activities on MacOS and Windows 10/11:
Brave: my daily browser, Chrome-based, security & privacy enhanced, reduced browsing surveillance enabled
Edge: for Microsoft 365 for Business and personal Microsoft application activities, Chrome-based, fully surveilled
Safari: security & privacy enhanced, reduced browsing surveillance enabled, Apple Reading List enabled and synchronized with my iPhone browser, not Chrome based
If I were to invest money in this productivity enhancement, it would need to work with all Chrome-based browsers on both Mac and Windows. Therefore, some testing was in order. Coincidently, Linda was taking a writing workshop and the Scheduled Notes extension came up in their discussions. Linda took the lead and contacted Finn with some technical questions from me.
Finn was quite approachable and helpful. He pointed Linda to the download on Gumroad.com and the easy-to-follow installation instructions. The download includes the JavaScript source code for buyers to review. That was very useful, but, it's like my Spanish language abilities: I can understand more than I can speak. I can read code and get an overview of what it is doing but I am NOT a coder nor software developer. My expertise is IT Security Management: Data breach readiness, remediation, recovery, rebuilding with Zero Trust.
As Linda and I were tinkering with the extension, the topic of using it with more than one Substack account came up. Linda and I both have two Substack publications with separate emial addresses. I had hoped that merely changing Chrome profiles would allow that to work. Linda contacted Finn to clarify. He told us that, due to Chrome's underlying use of common cookies, session controls, and other magical software spells and incantations, separate profiles would not work. We would need to use separate browsers, one for each account logged into Substack. This allows the underlying session controls to remain separate. Linda lives in standard Google Chrome for the bulk of her daily activities using tab groups and a dizzying array of open tabs (which drives me nuts). We'd need to install Brave on her Windows 11 laptop.
I am bilingual/biplatform: MacOS 15 on laptop and Mac Mini and Windows 10 & 11 on desktop and virtual machines. I have Google Chrome, Brave, and Microsoft Edge on both platforms in use during the day.
Assumption to test: The Substack Scheduled Notes Extension for Chrome browsers will work on any Chrome-based browser on MacOS and Windows 10/11. (Something Finn had not tried due to his personal workload as an employed full-time software engineer and the extension as his side gig.)
Result: The Substack Scheduled Notes Extension for Chrome browsers did operate correctly with Google Chromium, Brave, and Microsoft Edge on MacOS 15 and Windows 10/11. It would be a reasonable extrapolation that all Chrome-based browsers are acceptable platforms for the extension.
Installation Instructions: Google Chrome, Brave, Edge for extension version 1.2.3
These are the instructions included with the extension download.
Once your purchase is completed, click the DOWNLOAD button on the Gumroad site.
File will be saved to the folder designated in your Chrome Downloads Location setting.
Linda: C:\Users\Linda\Downloads
Paul: Windows: C:\Users\Paul\Desktop. MacOS: /Users/paul/Desktop
Unpack the zip file by double-clicking on it.
You will see a new folder named ChromeExtension6
In the Chrome URL bar, type chrome://extensions
Other Chrome-based browsers will accept and properly act on the keyboard input above then redirect to its customized extension page, such as brave://extensions, edge://extensions, etc.
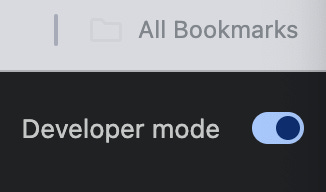
In the upper right of the Google Chrome window, toggle ON Developer mode. Developer mode may be in a different location for other browsers.
In the upper left of the window push the Load unpacked button

Navigate to the new folder uncompressed earlier
Linda: C:\Users\Linda\Downloads\ChromeExtension6\ChromeExtension
Windows may not display any file contents in the folder, rest assured there are files within.
Windows: Click Select Folder

Paul: MacOS - /Users/paul/Desktop/ChromeExtension6/ChromeExtension

Click Select
Extension is now loaded into the browser.
Make extension visible in the browser:
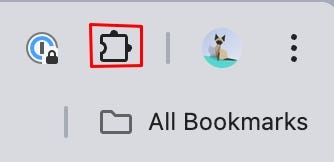
Select the puzzle piece icon in the upper right of the Chrome Window

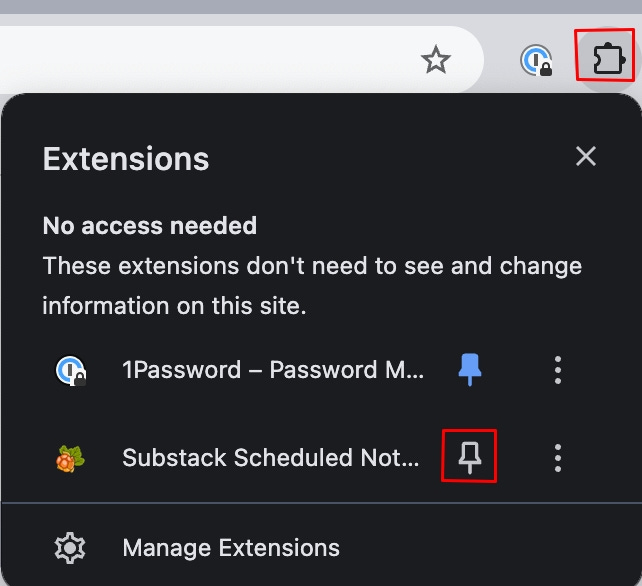
In the drop-down window, push the pin so it changes color or fills in to make the cloudberry icon visible

Other browsers may use a different icon; Edge uses and icon that appears to be an eye.
Push the X in the upper right of the drop down window to close the extensions window
Cloudberry icon should now be visible

Installation is now complete.


How To Use Scheduled Notes for Substack v1.2.3
Prerequisites
As noted above, the extension only works with one Substack account at a time. This will be fine for most Substack users. Those with more than one Substack account and publication have some extra work to do:
Download another Chrome browser to use on a second (or more) account. One new browser must be installed for each account using the extension and logged into Substack.
Here are some popular Chromium-based browsers from which to choose:
Microsoft Edge: Microsoft’s browser, which offers improved performance, privacy features, and integration with Microsoft services
Opera: Features a built-in VPN, ad blocker, and battery saver
Brave: Focuses on privacy with built-in ad and tracker blockers
Vivaldi: Highly customizable with advanced tab management and note-taking features
Epic Privacy Browser: Enhanced privacy protection, blocking trackers and ads
Slimjet: Fast and lightweight with anti-tracking features
Comodo Dragon: Security-focused with enhanced privacy features
Torch Browser: Includes media downloading tools and a torrent client
Ungoogled Chromium: An open-source version of Chromium without Google’s tracking
Caveat: This testing did not cover multiple publications under the same email address. Based on Finn's input, this is likely an unsupportable configuration for Chrome and his extension.
As of this writing the extension expects to be running on:
a machine powered on during posting schedule, potentially overnight
screen savers and computer sleep disabled, as they can suspend machine operations and prevent the Chrome Notes scheduler from working
Optional: screen monitor can be turned off to operate in "headless mode" to prevent screen burn-in on desktop machines
logged into the desired Substack account, one accout login per browser
The extension was developed on a desktop machine running 24x7.
Laptop users should schedule Notes postings during sessions where you are actively using the machine. Otherwise, you will need to attach your power cord, disable screen savers, disable computer sleep to post Notes in your absence.
Scheduling a Note
The basic process for scheduling a note is straightforward:
Login to your Substack account
Enter text into the Open Source Quill Editor
Schedule your Note
Save your note
Login to your Substack account
One account per browser, if you have more than one account for which you want to schedule posting Notes
My preference is to then navigate to my profile to prevent being distracted by the shiny new posts in my Home feed or the things I still need to fix on my web site home page
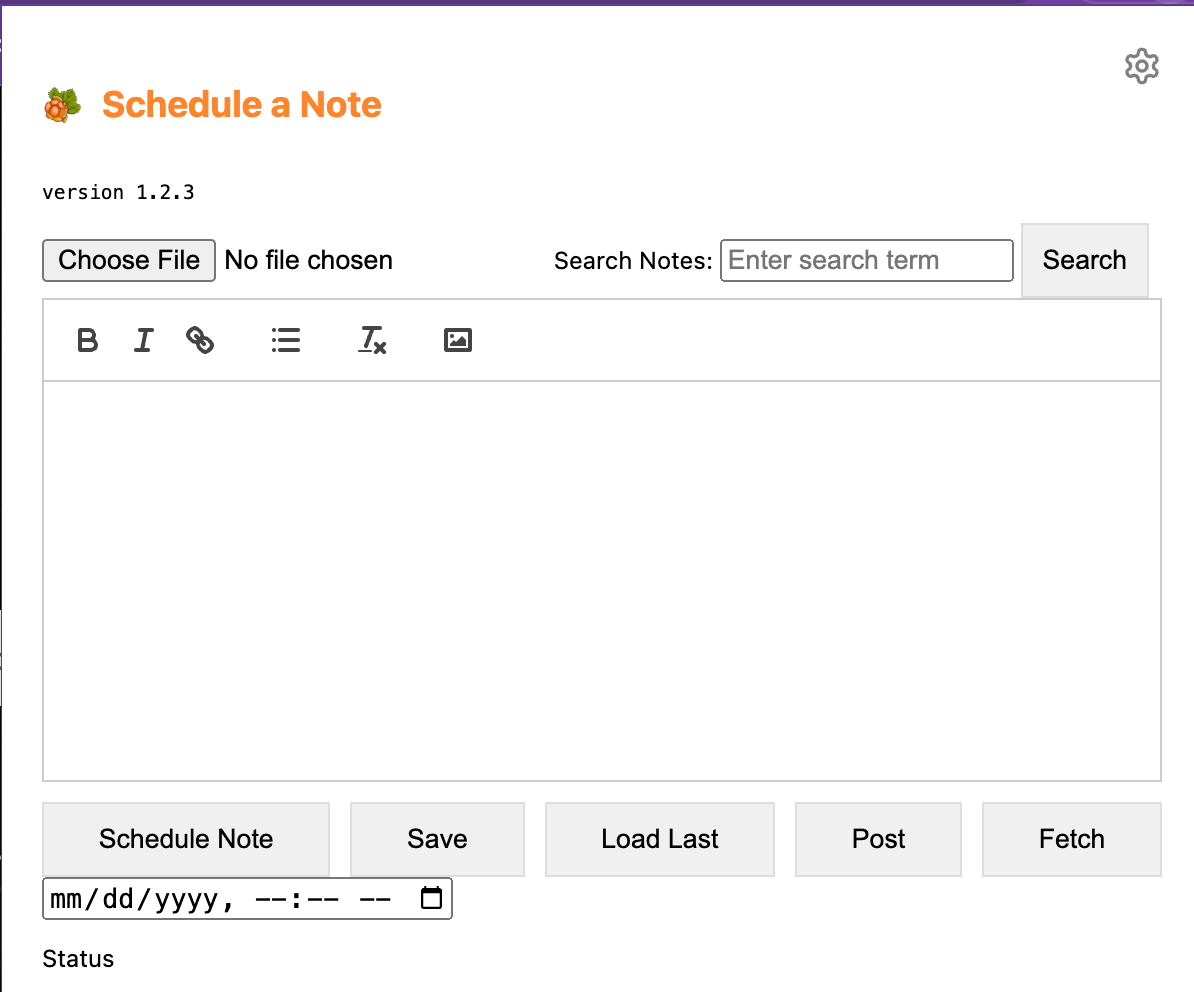
Click the new Cloudberry icon in the upper right of the Chrome browser. This opens the open source Quill editor that will be used for text entry.
Enter your text to post
Quill is a Rich Text editor that allows Bold, Underline, bullet lists, and hyperlinks.
a. One issue I found that is different from posting Notes directly from the Substack web site is that the link preview box at the bottom of the Note is not available due to the fact that Substack in not able to preview a link it does not know about. The Note will post without the preview box at the bottom.
From Finn: If you use a bulleted list, you must add one extra new line between the last sentence and the first bullet point in the list. Otherwise, the first sentence above the list becomes a bullet point, and some words from the lower points go up to the first line. This is a bug, but I have not found a working solution besides adding that extra line.
After text entry is completed …
Schedule your note:
Click the Calendar icon to the left of the date format box:
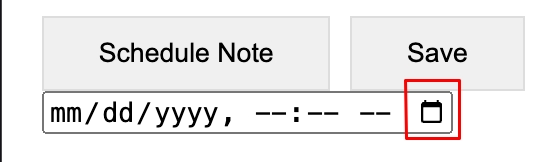
This opens the Scheduler drop down window

Select your desired date and time for the Note to be posted.

Select Schedule Note to tell the extension you are done editing and it's ready to be queued.

Save Your Note
Select Save to save the note in the event you want to revise it.

Click outside the extension window to close it. Your Note will be posted at the scheduled time.
Verify this by navigating to your Substack profile then click the Activity tab. The Note will appear directly below your last post when posted on Substack.

To add a subsequent Note:
Clear the Quill editor contents
Select all the Quill editor contents
Hit the delete key or backspace key on your keyboard
Text entry box is cleared
Editor is ready for new text
As of this writing, the scheduled dates and times may remain from the last Note scheduled
Be sure to select new dates and times, as needed, for your next note
Done!
You can now schedule Notes to your heart's delight and dominate your chosen publication category forever! You are now a Notes High Deity (cough, cough!)
A request: Linda and I did a considerable amount of work to test and develop this guide and worked directly with Finn Tropy to improve his wonderful extension. Please support our work and allow us to earn a nominal commission by purchasing the extension by using our affiliate link below.
Substack Scheduled Notes Extension for Chrome on Gumroad.com
We thank you for your support!

 | A guest post by
|
Paul's a wonderful resource for questions about Finn's scheduling tool. I totally enjoy using it.
Thank you, Paul and Linda!
This excellent post clarifies how to install and use the Notes Scheduler.
It is the "missing manual" that I should have written but have yet to find the time to do.
Great job !!!